Dyeing Easter eggs is a beloved tradition, and what better way to celebrate the holiday than by using natural ingredients to create beautiful and vibrant colors? In this article, I will share with you tips and tricks on how to dye Easter eggs naturally, providing you with a toxin-free and creative activity for the holiday.
Key Takeaways:
- Using natural ingredients to dye Easter eggs is an eco-friendly alternative to chemical dyes.
- Natural dyes made from ingredients like beets, turmeric, cabbage, and more are non-toxic and safe to use.
- Dyeing eggs naturally allows for more creativity and experimentation with different colors.
- Achieving desired colors may require adjusting the duration of time and number of dips in the dye.
- Following a step-by-step guide can help you create beautiful natural Easter eggs.
Why Dye Easter Eggs Naturally?
Dyeing Easter eggs naturally has become increasingly popular in recent years. Not only is it a fun and creative way to celebrate the holiday, but it also offers several benefits over traditional dyeing methods.
First and foremost, dyeing Easter eggs naturally eliminates the need for chemical dyes, which can be harmful to both the environment and our health. By opting for homemade Easter egg dyes made from natural ingredients, we can rest assured that the dyes are non-toxic and safe to use.
Furthermore, dyeing eggs naturally allows for a greater level of creativity. With a wide range of natural ingredients at our disposal, we can experiment with different combinations and create unique colors that can’t be achieved with store-bought dyes. It’s a wonderful opportunity to engage children in a fun and educational activity, fostering their creativity and appreciation for nature.
Not only are homemade Easter egg dyes eco-friendly and safe, but they also promote sustainability. By choosing to use natural ingredients, we reduce our reliance on chemical products and contribute to a more environmentally conscious approach to celebrating the holiday.
Quotes:
“Dyeing Easter eggs naturally allows for a more sustainable and mindful celebration, aligning with an eco-conscious lifestyle.” – Emma Roberts, Green Living Expert
In addition to these benefits, dyeing Easter eggs naturally is a budget-friendly alternative. Many of the ingredients used for homemade dyes can be found in our kitchens or readily available at affordable prices in grocery stores. It’s a cost-effective way to enjoy the holiday while minimizing our impact on the planet.
So this Easter, why not embrace the beauty of natural dyes and embark on a creative and eco-friendly egg dyeing adventure? With endless possibilities for color combinations and the satisfaction of knowing we’re making choices that are good for both our families and the environment, dyeing Easter eggs naturally is the perfect way to add a touch of sustainability to our holiday celebrations.
Continue reading to learn how to choose natural ingredients for dyeing Easter eggs and discover some exciting recipes for homemade Easter egg dyes.

Choosing Natural Ingredients for Dyeing Easter Eggs
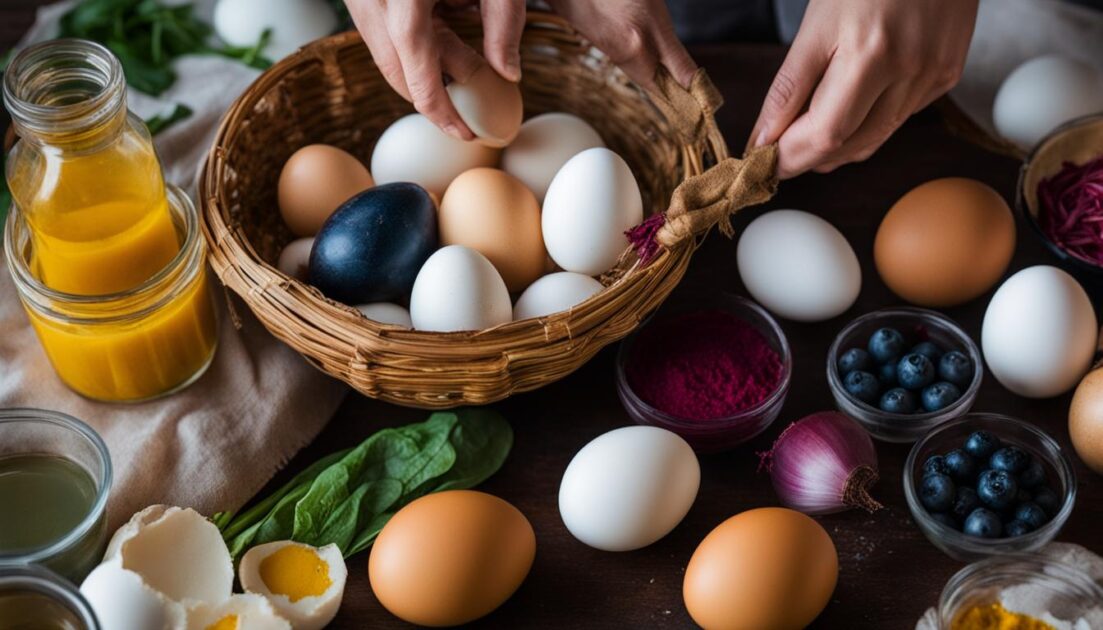
When it comes to dyeing Easter eggs naturally, the possibilities are endless. Nature offers a wide range of ingredients that can be used to create beautiful and vibrant colors. By harnessing the power of natural resources, you can transform ordinary eggs into stunning works of art. Here are some popular options for natural Easter egg coloring:
- Beets: Beets are known for their deep red color, which can be extracted and used as a natural dye. They create a rich and velvety hue that is perfect for creating eye-catching Easter eggs.
- Turmeric: With its vibrant yellow color, turmeric can add a sunny and cheerful touch to your Easter eggs. This spice is not only known for its health benefits but also for its ability to create vivid and striking hues.
- Cabbage: Cabbage can be surprisingly versatile in creating natural egg dyes. Purple cabbage, in particular, can yield beautiful shades of blue and lavender, while green cabbage can give a subtle green tint.
- Onion Skins: The skin of yellow onions can produce a warm and earthy orange color, while red onion skins can create a deep reddish-brown hue. These natural dyes can add a rustic and natural charm to your Easter eggs.
- Hibiscus Tea: If you’re looking for a delicate pink color, hibiscus tea is a great choice. Steep the tea and use it as a dye to create soft and feminine Easter eggs.
Each ingredient offers its own unique color palette, allowing you to experiment and create a diverse range of hues. However, it’s important to note that the color intensity may vary depending on factors such as the concentration of the dye, the type of egg used, and the duration of soaking. To achieve a richer color, consider using more of the natural ingredient when creating the dye.
Let your creativity run wild as you explore the world of natural Easter egg coloring. With these simple and non-toxic Easter egg dyes, you can create beautiful and eco-friendly decorations that will delight both young and old.

Recipes for Natural Easter Egg Dyes
Creating your own natural Easter egg dyes is a fun and rewarding process. Here are some simple recipes using common ingredients that you can try:
Recipe 1: Beet Juice
Ingredients:
- 3-4 beets
- 2 cups of water
- 2 tablespoons of vinegar
Instructions:
- Chop the beets into small pieces and place them in a saucepan with water.
- Bring the water to a boil and let it simmer for 30 minutes.
- Add vinegar to the mixture and remove it from heat.
- Allow the mixture to cool down before straining out the beet pieces.
- Submerge the hard-boiled eggs into the dye and let them soak for at least 1 hour for a vibrant color.
Recipe 2: Turmeric
Ingredients:
- 3 tablespoons of turmeric powder
- 2 cups of water
- 2 tablespoons of vinegar
Instructions:
- In a saucepan, combine the turmeric powder and water.
- Bring the mixture to a boil and let it simmer for 10 minutes.
- Remove the saucepan from heat and stir in the vinegar.
- Allow the mixture to cool down before straining it.
- Place the hard-boiled eggs in the dye and let them sit for 30 minutes to develop a vibrant yellow color.
Recipe 3: Red Cabbage
Ingredients:
- 1 small red cabbage
- 4 cups of water
- 2 tablespoons of vinegar
Instructions:
- Chop the red cabbage into small pieces and add them to a saucepan with water.
- Bring the water to a boil and let it simmer for 30 minutes.
- Remove the saucepan from heat and strain out the cabbage.
- Stir in the vinegar and let the mixture cool down.
- Immerse the hard-boiled eggs in the dye for at least 2 hours for a beautiful blue hue.
| Recipe | Ingredients | Instructions |
|---|---|---|
| Beet Juice | 3-4 beets, 2 cups of water, 2 tablespoons of vinegar | Chop beets, boil with water, add vinegar, strain, and soak eggs |
| Turmeric | 3 tablespoons of turmeric powder, 2 cups of water, 2 tablespoons of vinegar | Boil turmeric with water, add vinegar, strain, and soak eggs |
| Red Cabbage | 1 small red cabbage, 4 cups of water, 2 tablespoons of vinegar | Boil cabbage with water, strain, add vinegar, and soak eggs |

Tips for Achieving Desired Colors
When dyeing Easter eggs naturally, achieving the desired colors requires a bit of experimentation. By adjusting the duration of time and the number of dips in the dye, you can create a range of shades and intensities. Remember that different natural ingredients may produce unexpected colors, adding to the element of surprise and creativity in your Easter egg dyeing process.
“Experimentation is key when it comes to achieving the perfect colors with natural Easter egg dyes. Don’t be afraid to try different techniques and combinations to create unique and beautiful designs.”
Here are some tips to help you achieve the colors you desire:
- Start with a lighter shade: If you’re looking for a pastel color, begin by dipping the egg for a short duration in the dye.
- Increase the color intensity: To achieve a deeper hue, leave the egg in the dye for a longer period or repeat the dipping process multiple times.
- Experiment with different durations: Varying the duration of each dip can result in various shades and gradients.
- Combine colors: Feel free to mix different natural dyes to create unique and customized color combinations.
- Take notes: Keep track of the ingredients used, the duration of dipping, and the number of dips to replicate successful color outcomes in future dyeing sessions.
Remember, the joy of natural Easter egg dyeing lies in the creative process and the unique colors that can be achieved using organic and natural ingredients.
Tips for Long-Lasting Colors:
To maintain the vibrancy of your naturally dyed Easter eggs, follow these tips:
- Allow the eggs to dry completely before handling them to prevent smudging.
- Optionally, lightly coat the dried eggs with vegetable oil to give them a shiny finish and preserve the colors.
- Store the eggs in the refrigerator to keep them fresh for up to 5 days.
- Consume or use the eggs within a few days, as natural dyes may fade over time.
By following these tips, you can create beautiful and long-lasting Easter eggs with natural dyes.

Step-by-Step Guide for Dyeing Easter Eggs Naturally
Now that you have your natural Easter egg dyes ready, it’s time to start dyeing! Follow this step-by-step guide to create beautiful and vibrant Easter eggs using natural ingredients.
-
Prepare the eggs: Start by hard-boiling the eggs and allowing them to cool completely. Gently tap the eggs on a hard surface to create cracks for a marbled effect, or leave them smooth for solid color coverage.
-
Create the natural dye: Refer to the recipes provided in section 4 and choose the desired natural ingredient to make the dye. Follow the instructions to create the dye, adjusting the quantities as needed to achieve the desired color intensity.
-
Soak the eggs: Place the eggs in the dye solution and let them soak. The longer you leave the eggs in the dye, the deeper the color will be. For lighter shades, reduce the soaking time.
-
Experiment with colors: To create multicolored or patterned eggs, you can dip the eggs in different dyes or use a wax-resistant technique. For instance, you can use melted beeswax or a white crayon to draw patterns on the eggs before dyeing them.
-
Dry and polish the eggs: Once you’re satisfied with the colors, remove the eggs from the dye and place them on a paper towel or wire rack to dry. Avoid touching them until they are completely dry to prevent smudging. If desired, you can lightly coat the dried eggs with vegetable oil for a shiny finish.
And voila! You have beautifully dyed Easter eggs using natural ingredients. Display them in a decorative basket or use them for Easter egg hunts. The possibilities are endless!

Continue reading to discover a color guide for natural Easter egg dyes in the next section.
Color Guide for Natural Easter Egg Dyes
Natural dyes offer a wide range of colors for your Easter eggs, allowing you to create vibrant and unique designs. However, the final result may vary based on different factors such as the dye concentration and the egg’s natural color. To help you achieve the shades you desire, refer to the color guide below:
| Natural Ingredient | Color Produced |
|---|---|
| Beets | Pink to deep red |
| Turmeric | Yellow to golden |
| Cabbage | Blue to green |
| Onion skins | Orange to brown |
| Hibiscus tea | Purple to lavender |
Experiment with different ingredient combinations and proportions to create your desired Easter egg colors. Keep in mind that the longer you soak the eggs in the dye, the deeper and more intense the colors will become.

Using natural ingredients to dye Easter eggs not only allows you to avoid harmful chemicals but also adds a touch of creativity to your holiday celebration. Enjoy the process of discovering and creating beautiful colors with homemade Easter egg dyes.
Why Choose Natural Easter Egg Dyes?
There are several reasons why choosing natural Easter egg dyes is a great option. Firstly, natural dyes are eco-friendly, as they do not contain harmful chemicals that can pollute the environment. By opting for eco-friendly Easter egg dye, you can celebrate the holiday in a more sustainable way, reducing your carbon footprint and protecting our planet.
Furthermore, natural Easter egg dyes are non-toxic, making them safe for both children and adults. Traditional chemical dyes often contain harmful substances that can be absorbed by the eggshell and potentially contaminate the egg itself. Using non-toxic Easter egg dye ensures that you can enjoy a safe and healthy holiday tradition.
In addition to being eco-friendly and non-toxic, dyeing Easter eggs naturally allows for a more mindful celebration. You can engage in a creative and educational activity with your family and friends, exploring different natural ingredients and experimenting with vibrant colors. It’s a fantastic opportunity to bond with loved ones and learn about the natural world around us.
So, this Easter, consider choosing eco-friendly Easter egg dye and opting for a more sustainable and mindful celebration. Let your creativity flow while protecting the environment and promoting a healthier holiday tradition.
Tips for Long-Lasting Natural Easter Eggs
To ensure that your natural Easter eggs last, it’s important to follow a few tips. After dyeing, let the eggs dry completely before handling them to prevent smudging. If desired, you can lightly coat the dried eggs with vegetable oil to give them a shiny finish and preserve the colors. Store the eggs in the refrigerator to keep them fresh and enjoy them for up to 5 days. Remember, natural dyes may fade over time, so it’s best to consume or use the eggs within a few days.

Conclusion
Dyeing Easter eggs naturally is a fantastic way to create beautiful and vibrant colors without the use of chemical dyes. By using natural ingredients like beets, turmeric, cabbage, and more, you can transform ordinary eggs into stunning works of art. Plus, it’s an activity that the whole family can enjoy, fostering creativity and togetherness.
Follow the recipes and tips provided in this article to achieve the desired colors and experiment with different combinations. Whether you prefer soft pastels or bold and bright hues, there are endless possibilities to explore with natural Easter egg dyes.
Not only is this method eco-friendly and non-toxic, but it also allows you to embrace a sustainable and mindful approach to celebrating Easter. By opting for natural ingredients, you’re making a positive impact on the environment and reducing your exposure to harmful chemicals.
So this Easter, why not try your hand at dyeing eggs naturally? Celebrate the holiday in a safe, creative, and eco-friendly way while enjoying the process of exploring different colors and designs. Make your Easter egg decorating tradition even more special with these natural Easter egg dyes.
FAQ
How do I dye Easter eggs naturally?
Dyeing Easter eggs naturally involves using ingredients like beets, turmeric, cabbage, and more to create beautiful colors without the use of chemical dyes. You can follow the step-by-step guide provided in this article to learn how to dye Easter eggs naturally.
Why should I choose natural Easter egg dyes?
Natural Easter egg dyes are eco-friendly and non-toxic, making them safer for the environment and your health. Choosing natural ingredients for dyeing Easter eggs promotes sustainability and allows for a more creative and mindful celebration.
What are some natural ingredients I can use for dyeing Easter eggs?
Some popular natural ingredients for dyeing Easter eggs include beets, turmeric, cabbage, onion skins, and hibiscus tea. Each ingredient produces a different color, allowing you to create a vibrant and diverse palette of Easter eggs.
Can I achieve different colors with natural Easter egg dyes?
Yes, you can achieve a wide range of colors by using different natural ingredients. The color intensity may vary depending on factors such as the concentration of the dye, the type of egg used, and the duration of soaking. Experimenting with the number of dips and the duration of each dip can help you achieve the desired shades.
How do I dye Easter eggs naturally using these recipes?
You can dye Easter eggs naturally by following the step-by-step guide provided in this article. Each recipe outlines the ingredients, process, and tips for achieving the desired colors. It’s a fun and creative activity that you can enjoy with family and friends.
Can I make natural Easter egg dyes with everyday household items?
Yes, you can create natural Easter egg dyes using everyday household items like onion skins, coffee, and tea. These ingredients can produce beautiful and unique colors on your Easter eggs, allowing you to experiment with different combinations and create stunning designs.
How long will the colors last on naturally dyed Easter eggs?
Natural dyes may fade over time, so it’s best to consume or use the eggs within a few days. To preserve the colors, let the eggs dry completely after dyeing and store them in the refrigerator. Coating the dried eggs with vegetable oil can give them a shiny finish and help preserve the colors for a longer period.
Are natural Easter egg dyes safe for children?
Yes, natural Easter egg dyes made from non-toxic ingredients are safe for children to use. It’s a fun and educational activity that can engage children in a creative and hands-on experience while promoting a safe and eco-friendly celebration.
Why is using natural Easter egg dyes more sustainable?
Using natural Easter egg dyes is more sustainable because it eliminates the use of chemical dyes that can pollute the environment. By choosing natural ingredients, you can reduce your carbon footprint and contribute to a more eco-conscious lifestyle.
How long can I keep natural Easter eggs?
To ensure the longevity of your natural Easter eggs, store them in the refrigerator and consume or use them within 5 days. Remember that natural dyes may fade over time, so it’s best to enjoy the eggs while they are still fresh and vibrant.